Showing posts with label tutorial. Show all posts

Monday, 29 October 2018

Create a Halloween Pumpkin in Paint Shop Pro

You will need:
Included in Zip file to download HERE :
Pumpkin tube (or you can use one of your own choice)
Halloween stencil pspshapes

Also Alien Skin Eye Candy impact filter https://www.alienskin.com/eyecandy/

Before you begin:
Place Halloween stencil .pspshapes in your preset shapes folder in your PSP files
Place your pumpkin image in a folder where it can be located.

Use  my values as a guide only, particularly when using your own materials or when creating a different sized image.
Don’t forget to save often as a .pspimage. 

Open a new image 600 X 500 transparent raster background.
Open your pumpkin tube, copy and paste as a new layer.


Duplicate layer.
New vector layer.
Select preset shapes tool 


Select one of the Halloween stencils. Materials - background black, # 000000, foreground nil
Draw appropriate sized shape on your pumpkin.
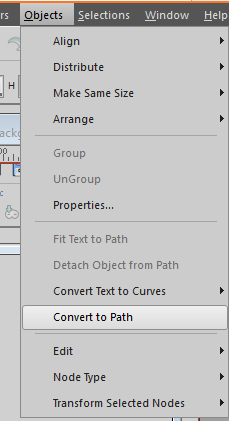

Whilst on that vector layer, go to the Selections Menu and choose "selection from vector object". 


 Close off visibility of that layer and return to your top pumpkin layer (copy of raster 2)


Hit delete key. 
The selection may not actually be visible in some versions of PSP but should still work.


Select None

Effects > Alien Skin Eye Candy Impact > extrude
I used these settings:


Go to layer beneath (raster 2) and using your magic wand select the transparent area outside the pumpkin. Make sure that in your tool settings "Use all layers" is NOT ticked.
These were my settings:


We'll use this selection to delete the unwanted extruded bits on the layer above (copy of raster 2).
Whilst selection in place, move to the layer above, and hit delete key:


Select none and duplicate copy of raster 2 layer. Change blend mode of this duplicate layer to multiply and lower opacity to 50%.

I gently erased a little of the lower part of this multiplied area as I thought that a bit too dark.


Return to bottom pumpkin layer (raster 2)
Layer > new adjustment layer > Brightness and contrast:


You may like to also save your image as a .png file at this stage, for future use.

Add a background, any changes to opacity/values of either your adjustment layer or multiplied layer needed - to your taste.

Add your signature. 


Note that you can animate this image by changing the opacity of the brightness adjustment layer to create your frames.The flickering image below was created in Animation Shop with only 3 frames.


Thanks to those who helped by testing this tutorial J
Judy
Comments welcome!

Wednesday, 21 March 2018

Creating an Egg Shape in Paint Shop Pro

Although bird eggs do come in slightly different shapes, they do seem to follow a pattern of a slightly pointy end with a somewhat thicker base.

This is how I created a pleasing and regular egg shape.

Open a new image 600 X 600 with a vector background.
View >  grid , guides, and rulers ticked.


Make sure your grid values are 100 horizontal and 100 vertical.


Place Guides in the following positions:
Vertical at 175 and 425
Horizontal at 330


Select your ellipse tool.


Make sure you have selected ellipse not circle in the tool bar.


Foreground null, background color of your choice.
Draw an ellipse  from  x:175 y:100  to x:425 y:500


Select the pick [object selector] tool and zoom in and make any minor adjustments to make sure your ellipse is plum within the grid and vertical guides:


Object> convert to path:


Select the Pen tool - your nodes will become  visible:


Zoom in and Click on each of the lateral nodes and holding down your left mouse button  pull each one straight down to your horizontal guide:


If you wish to have your egg a bit more "pointy", click on the node at the top and adjust the "arms" to make them shorter.


When you are happy with your shape, give your egg shape a name.


Select your egg with the pick tool [or object selector]
Right click and Export>Shape [Or File> Export > Shape]


I usually use the same name as I have given the shape as this makes it far easier to find it again when I want to use it.


If you wish to place it in a particular folder within your PSP shapes click on the little file icon to open the file location box [yes I have a LOT of folders:) ] :


To use your new shape simply select it from your dropdown list of PSP preset shapes:


I used the egg shape with a soft pink brown gradient and added shading and texture:


You can download a zip  with a .pdf version of this tutorial and gradient jm_brown_egg_1 HERE

You might also like to look at this tutorial, using an egg shape.

Please feel free to comment and post any queries.

Friday, 25 March 2016

Text Variation - Text on Text- Using a Mask

This sort of overlaid text effect was once fairly common in advertising.


To create "space" around the overlying text, you need to make a selection of your uppermost text, expand your selection and using that "expanded" selection  "cut out" your underlying text.
Now that is fine if your underlying text is a raster layer, but what if that layer is a vector? And what if you wish to move your uppermost text a smidgeon? It is certainly annoying to have to "undo/redo multiple steps".

The answer is to use a mask and link it to the top text layer:

1 First create a background layer [not absolutely necessary but I find it helps :) I used white
2 Create your bottom vector text . I used a red fill and no outline but any would do.
3 New mask layer  -show all

4 Create new vector layer for your uppermost text make sure it is NOT within this layer group but in a separate vector layer above it. [Layer > new vector layer]
 Place it in the approximate final position


5 Carefully select the actual text vector. Create a selection from vector layer. [Selection>selection from vector]
Selection>Modify> expand by 2 [or a value which suits i.e. creates a little space around your topmost text]


6 Keep selection. Go down to your mask and fill with black #000000


7 Select none. Notice how now part of that underlying text is masked out.
We will now link the actual mask to the overlying text.
8 While the mask layer is still selected, hold down the control Ctrl key and also select your top text and link these two.

This will enable you to move the mask and top text as one -important if you want to shift its position.
You can now alter your background to whatever you like and your bottom text layer  will stay "cut out" .


You can also convert your text layers to rasters and apply any effects or simply alter their properties. At any time later, you can move that top text layer and the cutout effect on the lower text layer will "follow" it.


Judy