Quick Vignette.
I was in a hurry[what's new] recently and tried a new way of making a vignette....something I find rather useful especially when I am trying to "match up " a couple of portraits which may have really varying backgrounds.
...and anyway I like them !
First scan your photo at at least 300dpi , higher if you think you are going to need to enlarge it much. Many old photos are really quite finely grained and will take quite a bit of enlargement.A nice size for a 12inch X 12 inch album page portrait is 5" X 7" if you want to add a bit extra text to your page.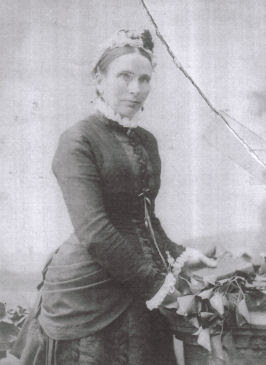

I usually save my scanned image as a .png file...which is a bit more stable than a .jpg file.

Duplicate your image and work on the duplicate. At this stage it is worth using your clone tool and scratch tool to do any running repairs....and yes save that image too.
Now to create your vignette.
Open your image in PSP.
1. New layer and floodfill with white. Lower the opacity of this layer to about 80% so you can just see the image below.
2. Using your eraser tool set at maximum size and opacity of about 9% carefully erase the face area first with outward sweeps.
Open your image in PSP.
1. New layer and floodfill with white. Lower the opacity of this layer to about 80% so you can just see the image below.
2. Using your eraser tool set at maximum size and opacity of about 9% carefully erase the face area first with outward sweeps.

3.Return the opacity of the layer to 100% and continue erasing the areas that you wish. I like to concentrate on the face and maybe hands and to get a reasonable outline of the upper body, letting the rest of the image fade into the background....but it will depend on your subject.I usually reduce the size of the brush and work on the eyes and lips to make sure thaey are especially clear.
Your best friend is your undo button :)
Your best friend is your undo button :)

4 Merge visible.
Why do I like this method? I like the amount of control it gives me...and the fact that the original photo remains intact on the layer below if I make a hash of it!
Why do I like this method? I like the amount of control it gives me...and the fact that the original photo remains intact on the layer below if I make a hash of it!
At this stage you can recolour to suit your project. eg sepia from black and white. or a slight colouring to match my background.
Another method of blending your image into your background and allow the texture to also come through, is to flood fill a layer below your image with your textured background, then change the blend mode of your portrait to multiply.

My Final image:

